Riding a motorbike is unmatched in excitement and freedom. The power at your fingertips, the wind in your face, and the open road ahead—car drivers can only dream of it. However, motorbike maintenance, especially braking system maintenance, should never be overlooked.
Maintaining your motorcycle’s brakes can save your life and ensure a smooth ride. Your brakes protect you from road hazards. A faulty brake system can reduce your motorcycle’s control, causing accidents or death.
Regular brake maintenance can also help you avoid expensive repairs. It’s cheaper to replace worn brake pads than to repair or replace a damaged brake disc. Regular maintenance extends the lifespan of brake system components, giving you more miles and rides.
Components of the Motorcycle Brake System
Understanding a motorcycle’s brake system’s key components and functions makes it simple. Let’s examine the essentials:
Brake Lever: The point where you, as a rider, interact with the brake system. A hydraulic or mechanical linkage connects it to the master cylinder.
Master Cylinder: When you squeeze the brake lever, it operates the master cylinder, which pressurizes the brake fluid in the system. It’s essentially a small piston that creates hydraulic pressure.
Brake Lines: These are the pipes (usually made of reinforced rubber or braided steel) that carry the pressurized brake fluid from the master cylinder to the brake caliper.
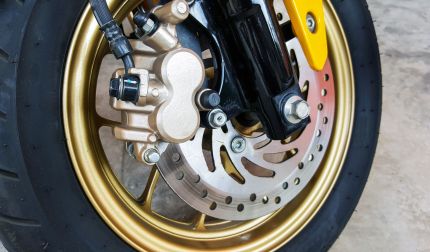
Brake Caliper: The brake caliper holds the brake pads and fits onto the brake disc. When the brake lever is squeezed, hydraulic pressure from the master cylinder causes the caliper’s piston(s) to push the brake pads against the disc.
Brake Pads: Fitted inside the caliper, these are the parts that make contact with the brake disc. When the brake lever is operated, they squeeze against the disc, causing it to slow down or stop.
Brake Disc (or Rotor): Attached directly to the wheel, the brake disc spins with it. The friction between the brake pads and the disc is what slows down and stops the wheel.
Function of Each Component in the Brake System
Each component of the brake system plays a vital role in ensuring its effective operation:
The brake lever is the interface between you and the braking system.
The master cylinder generates the hydraulic pressure that operates the brakes.
The brake lines transport this pressure to the caliper.
The caliper uses this pressure to squeeze the brake pads against the brake disc.
The brake pads create the necessary friction to slow down the wheel.
The brake disc, coupled directly to the wheel, is the surface against which this friction is applied to slow down or stop the motorcycle.
Types of Motorcycle Brakes: Drum vs Disc Brakes
Drum and disc brakes are the main motorcycle brakes.
1. Drum Brakes:
Drum brake shoes rotate with the wheel inside a cylindrical drum. Brakes slow the wheel by causing friction between the shoes and the drum. When overheated, drum brakes fade.
2. Disc Brakes:
When brakes are applied, brake pads in a calliper clamp onto a disc (or rotor) attached to the wheel. Disc brakes outperform drum brakes in stopping power, heat dissipation, and consistency, especially under heavy use. Most modern motorcycles have disc brakes, especially for the front wheel, which brakes most.
Maintaining and fixing your motorcycle’s front brakes starts with understanding the brake system’s anatomy, each component’s function, and drum vs. disc brakes. This knowledge underpins this article.
Common Symptoms of Worn Out or Damaged Brakes
Preventing minor brake issues from becoming major or dangerous requires early detection. Most symptoms are:
Reduced Stopping Power: Brake pads, discs, and fluid can cause this. Check your brake system if your motorcycle isn’t slowing down.
Squeaking or Squealing Noise: Brakes shouldn’t be noisy. When you brake, a high-pitched squeal usually indicates worn brake pads.
Grinding Noise: If your brake pads are completely worn and the metal backing is grinding against the brake disc, the squealing has likely turned into a grinding sound. Addressing this issue immediately can prevent brake disc damage.
Spongy or Hard Brake Lever: Air in the brake lines can make the brake lever spongy and easy to move. If the lever is stiff, the brake lines or master cylinder may be blocked.
Vibration or Pulsing During Braking: A warped or damaged brake disc may cause a vibration or pulsing when you apply the brakes.
Leaking Brake Fluid: A brake system leak may cause a puddle under your motorcycle or a drop in brake fluid in the reservoir. Hydraulic brake pressure requires brake fluid.
Dangers of Neglecting Brake Issues
Neglecting brake issues can be dangerous. Unchecked brake issues can lead to more expensive repairs and safety risks.
If you ride with worn brake pads, the metal backing can wear into the disc. Brake discs cost more than brake pads, so replacing them could cost more.
Riding without brakes can cause serious accidents. If you can’t slow down or stop your motorbike, you could hit a car, obstacle, or pedestrian.
In conclusion, recognising brake issues and fixing them quickly is essential for motorcycle performance and road safety.
Importance of Regular Brake Inspections
Motorcycle brakes last longer with preventive maintenance. This routine includes brake inspections. Brake inspections—how often? General rules:
Daily: Every ride, inspect the brake lever and test its resistance. Just enough to spot leaks, damage, and lever resistance.
Monthly: Thoroughly inspect. If your brake pads are less than 1/8th of an inch thick (two pennies stacked), replace them. Check brake discs for grooving, warping, or damage. Check the brake fluid reservoir and brake lines for leaks.
Annually or every 12,000 miles (whichever comes first): A thorough inspection and brake fluid change are needed now. Unless you’re confident, hire a pro. They’ll check everything above, plus the master cylinder and brake lines.
Brakes may need more frequent inspections depending on how and where you ride. If you commute by motorbike in city traffic, where you stop and start often, your brakes may wear out faster than if you ride on the open road.
What to Look for During a Brake Inspection
During a brake inspection, here’s what you need to check:
Brake Pads: Look at the thickness. Replace them if they are less than 1/8 inch thick. Also, look for any signs of uneven wear, which could indicate an issue with the caliper.
Brake Discs: Look for any signs of grooving, warping, or cracking. Spin the wheel and observe if the disc runs true or wobbles.
Brake Fluid: Check the fluid level in the reservoir and also its color. Fresh brake fluid is clear to light yellow. Change if it’s dark brown or black.
Brake Lines: Look for any signs of cracking, bulging, or leaks.
Brake Lever: Test the lever for appropriate resistance. It should feel firm, not spongy or overly hard.
The importance of regular brake inspections cannot be overstated. They can help you catch issues early, before they turn into significant problems, keeping your motorcycle performing at its best and you safe on the road. Regular inspections also reduce the risk of expensive repairs or replacements in the future.
Preparations Before Starting the Repair
Safe Practices for Working on Your Motorcycle
Motorcycle maintenance involves mechanical and electrical systems. Avoid accidents by prioritising safety. Safe practises:
Use the Right Tools: Tools make work easier and safer. Use well-maintained, task-specific tools.
Wear Protective Equipment: Wear gloves to avoid sharp objects and chemicals. Working under the motorcycle or with splashing fluids requires safety glasses.
Work in a Well-Ventilated Area: Brake fluid and other brake maintenance chemicals release harmful vapours. Avoid these fumes by working in a well-ventilated area.
Follow Manufacturer Guidelines: Use your motorcycle’s service manual for maintenance. It’s the best motorbike information source.
Don’t Rush: First-timers should take their time. Rushing can cause mistakes and accidents.
Preparing Your Motorcycle for Brake Maintenance
Preparing your motorcycle makes brake repair easier. Follow these steps:
Stabilize Your Motorcycle: Start by stabilising your motorcycle. Center or paddock stands work. A stand that lifts the front wheel may be needed for front brake work.
Allow the Brakes to Cool: After riding your motorcycle, let the brakes cool down. Working on a hot brake disc or calliper can cause burns.
Clean the Brake Components: Use a brake cleaner to clean the disc and calliper. Dirt, grease, and brake dust are removed.
Gather the Necessary Tools and Parts: Make sure you have all the tools and parts, including brake pads if you’re replacing them, before starting. Sockets, brake piston spreaders or C-clamps, brake cleaner, and rags may be needed.
Maintenance requires preparation. Taking the time to work safely and prepare your motorbike can save you time and make the process go more smoothly.
Step-by-Step Guide to Fixing Front Brakes on a Motorcycle
Step 1. Removing the Front Wheel and Brake Assembly
Secure the Motorcycle: Stabilize your motorcycle on a centre stand or front wheel lifting stand.
Remove the Brake Caliper: Remove the front fork-brake calliper bolts with a socket set. After removing the bolts, slide the calliper off the brake disc. Avoid hanging the calliper by the brake line to avoid damage. Wire or string it to the handlebars.
Remove the Front Wheel: Remove the axle nut and slide out the axle, depending on the motorcycle.
Step 2. Inspecting and Cleaning the Brake Assembly
Inspect the Brake Disc: Look for signs of damage, such as grooves, cracks, or warping. If any are present, consider replacing the brake disc.
Clean the Brake Caliper: Use a dedicated brake cleaner to clean the caliper thoroughly, paying special attention to the piston area.
Step 3. Replacing Brake Pads and/or Discs
Remove the Old Brake Pads: Remove brake pads if you’re replacing them. Remove the pads’ pins or bolts.
Replace the Brake Disc (if necessary): Unbolt the brake disc from the wheel hub and replace it to replace it.
Install the New Brake Pads: Insert the new brake pads into the calliper and secure them with the pins or bolts you removed.
Step 4. Checking Brake Fluid and Brake Lines
Check the Brake Fluid Level: Fill your handlebar brake fluid reservoir to the recommended level.
Inspect the Brake Lines: Brake lines may crack, bulge, or leak.
Step 5. Reassembling the Brake System
Install the Front Wheel:Slide the wheel back onto the forks with the brake disc between the calliper pads.
Reattach the Brake Caliper: Securely attach the brake calliper to the fork without overtightening.
Step 6.Testing the Repaired Brake System
Check Brake Lever Feel: Check brake lever feel before riding. Pump it to ensure it’s firm.
Test Ride: To test the brakes, ride your motorcycle. Slowly test the brakes before speeding up.
Consult a professional mechanic if you’re unsure about any step. Mistakes when fixing brakes can be dangerous. Safety comes first.
Common Mistakes to Avoid During Brake Maintenance
Avoidable Errors that Could Damage Your Brakes:
Using the Wrong Tools: Incorrect tools can damage your motorcycle’s delicate parts. Using pliers to push back brake pistons can damage the pistons and calliper.
Not Cleaning the Brake Components: Dirt, grime, and brake dust can wear brakes prematurely. These contaminants can enter the brake system if brake components are not cleaned before work.
Overlooking Brake Fluid Replacement: Brake fluid is essential to brake system operation. It’s often overlooked during brake maintenance. Brake performance and system damage can be reduced by old, dirty, or water-contaminated brake fluid.
Neglecting the Brake Lines:Rubber brake lines can leak over time. They can cause brake pressure loss if ignored during a brake inspection.
Reusing Old Hardware: Replace clips and pins when replacing brake pads. Old hardware can make new brake pads fit poorly or perform poorly.
Tips to Ensure a Successful Brake Repair
Refer to Your Service Manual: Your motorcycle’s service manual is your best friend for maintenance and repair. It provides motorcycle-specific manufacturer-approved methods and specifications.
Double-Check Your Work: Double-check your work throughout. For instance, check bolt torque, brake pad installation, and so on.
Never Rush the Job: Avoid rushing brake maintenance. Take your time and do everything safely.
Invest in Quality Parts and Fluids: When it comes to brakes, quality matters. High-performance brake pads, discs, and fluid last longer.
Don’t Ignore Problems: Don’t ignore brake maintenance issues. If you’re unsure, ask a mechanic. Ignoring a problem can cause bigger issues.
Brake maintenance prevents problems, not just fixes them. Avoiding common mistakes and following best practises can keep your motorcycle’s brakes in top shape, providing safe and reliable stopping power.
Maintaining Your Brakes: Post-Repair Care
Routine Brake Maintenance Tips
Regular Inspections: Regularly check your brakes. Check for obvious issues like brake fluid leaks, worn brake pads and damaged brake lines.
Brake Cleaning: Dirt, grime, and brake dust can affect brake performance and premature wear. Clean the brake disc and calliper regularly with a dedicated brake cleaner.
Brake Fluid Changes: Over time, brake fluid absorbs water from the air, reducing braking performance and causing brake system corrosion. Change the brake fluid every 1-2 years, but check your motorcycle’s service manual for the manufacturer’s recommendation.
Proper Storage: If you’re storing your motorbike for a long time, check the brakes. To avoid rust and corrosion, clean the brakes and use fresh brake fluid.
Proper Riding Techniques to Extend Brake Lifespan
Avoid Unnecessary Braking: Overbraking wears brake components faster. Avoid braking by anticipating traffic flow and adjusting speed.
Use Both Brakes: Some bikers use one brake (usually the front brake). This strains the brake and causes uneven wear. Use both brakes to stop evenly.
Engine Braking: Use engine braking (throttle release and downshifting) and brakes to slow down. This slows the motorcycle and reduces brake load.
Avoid Riding in Dirty Conditions: Riding in muddy or dusty conditions can cause brake components to wear faster. Clean your brakes after riding if you can’t avoid these conditions.
Maintaining your brakes is an ongoing process. By taking care of your brakes after the repair and practising good riding habits, you can keep them in good condition for longer, giving you reliable stopping power when you need it.
Conclusion
As a motorbike owner, learning to repair and maintain your bike is rewarding and empowers you to take better care of it. Understanding your motorcycle’s brakes and other components helps you handle problems.
If you’re unsure about any maintenance task, including brake repairs, consult a professional mechanic. It’s important to remember that working on a motorcycle requires precision, and mistakes can have serious consequences, especially with a critical system like the brakes.
Regular brake maintenance is crucial for motorcycle riders of all levels. Your riding skills and bike’s condition affect safety. Always prioritise safety and be proactive. Enjoy the ride and be proud that you’re maintaining your motorbike safely.
Frequently Asked Questions
How often should I replace my motorcycle brake pads?
Your riding style, conditions, brake pads, and motorcycle determine how often you should replace them. Check brake pads every few thousand miles. Replace pads when they’re 2 mm or less. Follow your motorcycle’s service manual.
Can I use car brake fluid in my motorcycle?
Motorcycle brake fluid is recommended over car brake fluid, even though their chemical compositions are similar. Motorcycle-specific brake fluids are designed for more sensitive and higher-temperature brake systems.
How do I know if my motorcycle brake discs need replacing?
Your motorcycle’s service manual specifies the minimum thickness of brake discs. Replace the disc if it’s thinner than this. Deep grooves, cracks, or overheating discoloration may indicate that your brake discs need replacing.
Why are my motorcycle brakes squeaking?
Squeaking brakes can be caused by dirty brake components, glazed or worn brake pads, or disc issues. Investigate squeaky brakes to find the cause. A good clean may fix the noise, but it could also mean parts need to be replaced.
Can warped motorcycle brake discs be fixed?
It’s not advised to fix a warped brake disc. Fixing warping could cause unsafe braking. Warped discs should be replaced. Always put motorcycle brake safety first.


")
